Eat a lot during Christmas time? Do not worry! Try one of these 10mins workouts :)
Click here
Be fit always!
Merry Christmas :)
Enjoy!
Wednesday, December 24, 2014
Friday, December 12, 2014
Oatmeal cranberry cookies recipe
I have some oatmeal & cranberry given by a friend who leaves France back to the States, so I looked for a recipe to make some desserts with the oatmeal and dry fruits, and here you go - oatmeal cranberry cookies :)
It's real simple, you just need to mix everything together!

Ingredients (for about 32 cookies)
1/2cup or 120g butter (room temperature)
3/4cups brown sugar
1 egg
1 tsp vanilla extract
3/4 cup flour*
1/2tsp baking soda
1/2tsp baking powder
1/4tsp salt
1/2tsp cinnamon
1 1/2cups oats
1/2cup dry fruits - raisins, cranberry, coconut or even chocolate chip
*it is whole wheat flour in the recipe, I used normal flour since I don't have any whole wheat flour at home :(
Instructions
1. Preheat the oven to 180°c
Beat butter and sugar until they mix well together
2. Add in egg, mix well
Add vanilla extract
3. Add in all dry ingredients - flour, baking soda, baking powder, salt and cinnamon. Mix well
4. Add in oats then dry fruits, chocolate chips, anything you want to add in
5. Line a baking sheet on a tray
Use a table spoon (preferrable measuring spoon = in half ball shape) to scoop the mixture to the tray, use a small spoon to help to scrap the mixture out of the table spoon.
Don't put them too close, or they will stick together at the end - Because the cookie mixture will be flatten & it rises (=bigger size) when it becomes cooked in the oven
6. Bake for 12 mins
Enjoy!
It's real simple, you just need to mix everything together!
1/2cup or 120g butter (room temperature)
3/4cups brown sugar
1 egg
1 tsp vanilla extract
3/4 cup flour*
1/2tsp baking soda
1/2tsp baking powder
1/4tsp salt
1/2tsp cinnamon
1 1/2cups oats
1/2cup dry fruits - raisins, cranberry, coconut or even chocolate chip
*it is whole wheat flour in the recipe, I used normal flour since I don't have any whole wheat flour at home :(
Instructions
1. Preheat the oven to 180°c
Beat butter and sugar until they mix well together
2. Add in egg, mix well
Add vanilla extract
3. Add in all dry ingredients - flour, baking soda, baking powder, salt and cinnamon. Mix well
4. Add in oats then dry fruits, chocolate chips, anything you want to add in
5. Line a baking sheet on a tray
Use a table spoon (preferrable measuring spoon = in half ball shape) to scoop the mixture to the tray, use a small spoon to help to scrap the mixture out of the table spoon.
6. Bake for 12 mins
Enjoy!
Friday, November 28, 2014
Butternut/squash recipe
Happy thanks giving!
I know I know, it's black Friday, I want to make pumpkin pie but it is very expensive here :(
This week I found a super big butternut but it costs cheap, so I decide to find a recipe to cook it! It's my first time to make butternut so I have no idea what kind of dish I can make.
I'm glad that I found this recipe because it's surprisingly delicious!

Ingredients:
Butternut
For each half of butternut:
1 clove garlic
1tsp lemon juice
5g butter
some vegetable/olive oil
150g cheese (grated)
1tsp herb
pepper
salt
Instructions:
1. Preheat the oven at 190°c
Cut the butternut into half (vertically), remove the seeds inside
2. Put garlic, lemon juice, butter in the hole - the place you where the seeds were (see the photo), brush oil on the top of the rest of the flesh
3. Bake the butternut for 40-60mins
Let it cool down
Turn the temperature of the oven to 160°c
4. Remove the flesh out and put it in a food processor, mix with cheese, herb, salt & pepper
Pour the mixture to a dish
Put back to oven to bake for another 20-25mins or until the cheese on the top becomes golden
Note: you can keep the skin if you are careful enough, after mixing in the ingredients, you can now put the mixture back to the skin! Fill it up!
5. Ready to serve - hot hot hot!
Enjoy!
I know I know, it's black Friday, I want to make pumpkin pie but it is very expensive here :(
This week I found a super big butternut but it costs cheap, so I decide to find a recipe to cook it! It's my first time to make butternut so I have no idea what kind of dish I can make.
I'm glad that I found this recipe because it's surprisingly delicious!
Ingredients:
Butternut
For each half of butternut:
1 clove garlic
1tsp lemon juice
5g butter
some vegetable/olive oil
150g cheese (grated)
1tsp herb
pepper
salt
Instructions:
1. Preheat the oven at 190°c
Cut the butternut into half (vertically), remove the seeds inside
2. Put garlic, lemon juice, butter in the hole - the place you where the seeds were (see the photo), brush oil on the top of the rest of the flesh
3. Bake the butternut for 40-60mins
Let it cool down
Turn the temperature of the oven to 160°c
4. Remove the flesh out and put it in a food processor, mix with cheese, herb, salt & pepper
Pour the mixture to a dish
Put back to oven to bake for another 20-25mins or until the cheese on the top becomes golden
Note: you can keep the skin if you are careful enough, after mixing in the ingredients, you can now put the mixture back to the skin! Fill it up!
5. Ready to serve - hot hot hot!
Enjoy!
Thursday, November 27, 2014
Keep fit is a life-long challenge

Click here to read it.
My advice is - Make your workout routine! Keep it up, Believe that you CAN do it and ENJOY doing it!
Enjoy!
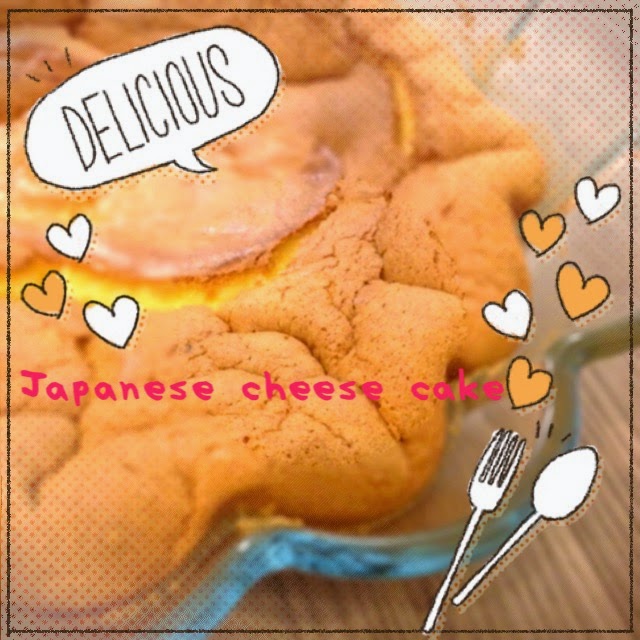
Thursday, November 20, 2014
Japanese cheese cake - fluffy & soft texture
The first time I tried a cheese cake, it failed, not strong flavor.... so I was afraid to make the cheese cake again, until I found a lemon cheese cake recipe, I loved it so much. Recently I found another recipe to make Japanese cheese cake, with fluffy & soft texture, that is why I want to give it a try.
Ingredients
250g milk
250g cream cheese, room temperature
60g butter, room temperature
6 egg yolks
55g cake flour
20g corn flour
1 lemon zest
6 egg whites
1/4tsp cream of tartar/powder of tartar (optional)
130g sugar
Instructions
1. Pour milk and put cream cheese in a bowl on simming water, cream cheese will melt. Try to mix well with milk. It takes some time until the cream cheese is dissolved into the milk. Add in butter, mix until totally melt into the mixture.
2. Turn off the heat, add egg yolks
Let the mixture cool down
3. Add in flour and corn flour, it is ideal to mix until no lumps, use spetula to help - press the flour towards the sides of the bowl
Add lemon zest
4. In another bowl, beat egg white until soft peak is formed
Add cream of tartar and sugar, beat until peak form
5. Pre-heat the oven at 150°c
Fold in egg white mixture in 2-3 times
6. Pour the mixture into a 8" mold, place mold on the tray and add hot water up to half of the mold*
Bake for 50-60mins
*Note: it is to help the bottom of the mixture cook well
7. Turn off the oven, open door a bit for 10mins**
Let it cool down, then put into the fridge for 3hours before serving
**Note: let some cool air in the oven can help to prevent the cake collapse completely

Enjoy!
Friday, November 14, 2014
Madeleine Ispahan - rose flavor
The famous French chef Pierre Herme has a great success in making madeleine Ispahan, I want to give it a try since it is famous lol

I bought the mould finally haha :)
My husband loves it, the texture is spongy, soft & moist, he might allow me to buy a mold lol
 At that time I did't have any madeleine mold at home, so I use a fancy one that I have ;)
Ingredients
125g butter
15g cream or milk (better whole fat cream or whole milk)
10g rose essence*
0.2g red eatable colorant
120g sugar
*If it is rose water, please multiply the quantity by 3 times
** Substitue trimoline by honey, I tried and it works well
Instruction
1. Melt the butter and put aside
Preheat the oven at 180°c
2. In a small mixing bowl, mix cream/milk, rose essence and red eatable colorant
3. In a big mixing bowl, mix egg & sugar, add in trimoline
Add in flour and baking powder little by little
Then add in cream/milk mixture of step 2
4. Add in melted butter, with fast & light motion, mix well
Add in raspberries, mix quickly until they are about evenly distributed in the mixture
Note 1: mix fast -not to form gluten in the mixture => create spongy and soft texture
Note 2: If the size of raspberries is too big, tear down into small pieces
5. Leave the mixture rest for 15mins
6. Pour the mixture to the mold until 70% filled
Note: in the recipe it says fill the mixture in a piping bag and then squeeze the mixture to the mold
7. Put the mold into the oven and bake for 12-15mins, or until the madeleine becomes golden color
Cool down and ready to serve
Enjoy!

I bought the mould finally haha :)
My husband loves it, the texture is spongy, soft & moist, he might allow me to buy a mold lol
 At that time I did't have any madeleine mold at home, so I use a fancy one that I have ;)
Ingredients
125g butter
15g cream or milk (better whole fat cream or whole milk)
10g rose essence*
0.2g red eatable colorant
120g sugar
125g egg
18g trimoline**
125g flour
4g baking powder
30g raspberries (I didn't have any at home so I didn't add it)*If it is rose water, please multiply the quantity by 3 times
** Substitue trimoline by honey, I tried and it works well
Instruction
1. Melt the butter and put aside
Preheat the oven at 180°c
2. In a small mixing bowl, mix cream/milk, rose essence and red eatable colorant
3. In a big mixing bowl, mix egg & sugar, add in trimoline
Add in flour and baking powder little by little
Then add in cream/milk mixture of step 2
4. Add in melted butter, with fast & light motion, mix well
Add in raspberries, mix quickly until they are about evenly distributed in the mixture
Note 1: mix fast -
Note 2: If the size of raspberries is too big, tear down into small pieces
5. Leave the mixture rest for 15mins
6. Pour the mixture to the mold until 70% filled
Note: in the recipe it says fill the mixture in a piping bag and then squeeze the mixture to the mold
7. Put the mold into the oven and bake for 12-15mins, or until the madeleine becomes golden color
Cool down and ready to serve
Enjoy!
Wednesday, October 29, 2014
Utane method of making bread - create super soft texture
I have been making bread for a year, from the beginning that I knew nothing about making bread (no technique no skills), then knowing using the yeast, how to rise the dough, how to knead the bread.... after having lots of failures, I can say now I KNOW how to make bread! I'm so proud because I didn't take any class, I like self learning to discover new things lol
There are so things to learn on internet, I saw a method to make bread to make it softer - overnight dough - by putting the dough in the fridge a night before ... this summer, I found a better method to soften the bread! The texture is spongy & soft, it is the best method that I found until now.
So, let me share with you - Utane dough method. This method is from Japan - you must learn it if you like making bread!

The ingredients needed are flour & water, the portion is important
Water : flour = 5 : 1
For example: 50g water: 10g flour
Instructions:
1. Mix water and flour in a sauce pan, make sure the flour is well dissolved into the water, you can use a spetula to press the flour lumps => until there is no lumps left
2. Turn on the heat to medium at the beginning, when the mixture start being heat (you can start seeing a bit of steam), then reduce the heat to low.
Use a spetula to stir the mixture - KEEP stirring it so that no lumps formed (over cooked)
3. KEEP stirring... until the mixture becomes thickened
How to know when it is ready? when you stir the mixture, the stir trace/mark is shown clearly
4. Cool down the mixture, it is ready!
*You can watch this video to get a better picture - I would prefer using a spetula
Next time I will share the recipe of brioche - see the photos of my last post ;)
There are so things to learn on internet, I saw a method to make bread to make it softer - overnight dough - by putting the dough in the fridge a night before ... this summer, I found a better method to soften the bread! The texture is spongy & soft, it is the best method that I found until now.
So, let me share with you - Utane dough method. This method is from Japan - you must learn it if you like making bread!
The ingredients needed are flour & water, the portion is important
Water : flour = 5 : 1
For example: 50g water: 10g flour
Instructions:
1. Mix water and flour in a sauce pan, make sure the flour is well dissolved into the water, you can use a spetula to press the flour lumps => until there is no lumps left
2. Turn on the heat to medium at the beginning, when the mixture start being heat (you can start seeing a bit of steam), then reduce the heat to low.
Use a spetula to stir the mixture - KEEP stirring it so that no lumps formed (over cooked)
3. KEEP stirring... until the mixture becomes thickened
How to know when it is ready? when you stir the mixture, the stir trace/mark is shown clearly
4. Cool down the mixture, it is ready!
*You can watch this video to get a better picture - I would prefer using a spetula
Next time I will share the recipe of brioche - see the photos of my last post ;)
Thursday, October 23, 2014
Brioche - so soft & yummy
I have made this brioche for few times already, each time we just love it! I will continue to make it more often ;)

I love the shape, it's so funny, like a cloud haha!
I love the shape, it's so funny, like a cloud haha!
Monday, October 20, 2014
Cantonese Egg tart
I have seen some egg tarts in a wedding, my friend said she liked eating egg tart and she missed it! So I said I could try to make some for her, that is why I found this recipe from Christine.


Ingredients
Crust:
225g flour
55g icing sugar
125g butter (cold)
1 whisked egg
Vanilla extract
Custard:
150g hot water
1 egg
50g sugar*
75 g evaporated milk
1/2tsp vanilla extract
*In the original recipe, it is 70g, but I found too sweet
Instructions
Crust:
1. Mix flour, icing sugar, and butter together with a flat beater. You can also use your fingertips to mix well the ingredients
2. Add in egg & vanilla extract
3. Knead the dough and then roll it out on a lightly floured surface to 1/2cm (do not roll out too thin), better keep the thickness more than less
4. Use a round cookie cutter to cut the round shape out, the size is ideally a bit smaller than the opening of the tart mould (it is normal if you found that the dough cannot completely cover the mould when you first place it on the mould)
5. Then press the dough from the bottom towards the side of the mould while you turn the mould clockwise or anti-clockwise, now you can fill the dough over the mould
Put it aside
Custard:
1. Preheat the oven to 200°c
Boil the water until hot, not necessary to boil it up to boiling point
2. In a bowl, mix eggs, sugar, evaporated milk & vanilla extract
3. Add in the hot water into the mixture little by little! It is not to cook the egg
4. Pour the egg mixture into the crust, fill in 70% - max.80%
The reason is that the crust may shrink, if it doesn't, you can fill up to 90%
5. Put the tart into the oven for 10-15mins until the crust become brown
6. Lower the heat to 180°c, watch out the tarts! When the egg puffs, you can slightly open the oven door and bake for another 10-15mins or until it is cook
Why? avoid the egg collapse once it is cool down
How to know if the egg is well cook? insert a tooth pick in the tart, if it stands = well cook!
Enjoy!
Monday, October 13, 2014
Wedding cake with roses & pearls
I got this order quite late (about 2 weeks before the wedding) but I wanted to do it since it's for my "sister's" wedding.
The most challenging thing for me is still the transport! But it was good so I was relieved!
 I wanted to make white icing this time, I feel white white color icing is elegant :) I know the bride loves blue so I made these roses in blue.
I personally like pale pink though ;p

I'm so happy that the cake is almost all gone and I got many positive feedback on the cake - taste and appearance ;)
Praise the Lord!
The most challenging thing for me is still the transport! But it was good so I was relieved!
I wanted to make white icing this time, I feel white white color icing is elegant :) I know the bride loves blue so I made these roses in blue.I personally like pale pink though ;p
The cake top is added at the end :) Now everyone can tell it's a wedding cake lol
I'm so happy that the cake is almost all gone and I got many positive feedback on the cake - taste and appearance ;)
Praise the Lord!
Super tasty yogurt of ewe

I bought this yogurt from Carrefour supermarket, it is quite expensive (1.6€ for one pot of 140g) but it is super tasty! I was so delight!
When my husband went home, I told him about it. He said it is the yogurt of ewe (brebis in French). May be it explains haha! I didn't even look at the detail of the yogurt lol
Thursday, October 9, 2014
Cupcakes with icing - new test of white colorant
I have another sister of a bible study who will get married this coming Saturday. We celebrated the bridal shower last Friday after the meeting, to give a surprise to her :) so they asked me to prepare some cupcakes for her. That is why I need to make some white icing to match the wedding theme!

See, it is very white the icing! I'm so pleased! now I can make more professional icing haha!
So I searched on internet and found that there is white colorant to whiten the icing..... I heard that people would use shortening to replace butter to make the icing whiter, but I prefer the smell of butter so I simply use white colorant to color it :)
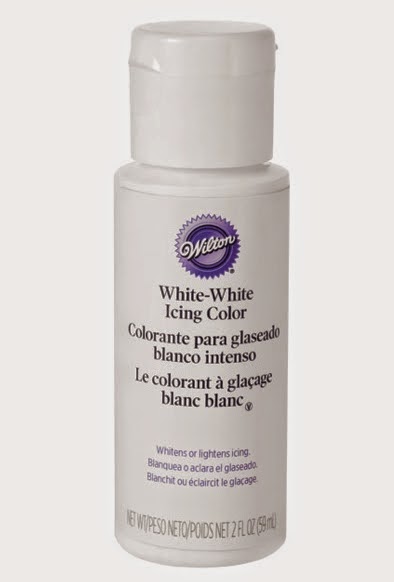
I bought Wilton's white white colorant, which is liquid => it will soften the icing to become more liquid, so you might need to add more icing sugar or put the icing in the fridge to harden it a bit before you use.
Monday, September 29, 2014
Wedding cake is a piece of art
My church friends got married last Friday, they ordered 2 wedding cakes. I was so happy to have this opportunities to work on it for them.
One thing drove me crazy is that to mess up the kitchen, I really hate seeing my kitchen being dirty and messy! I liked keeping it clean while I was baking cakes haha! I wipe the table all the time when I cook :s do I have OCD??
When I made the icing, the icing sugar just spread everywhere... EVERYWHERE! I just let it spread everywhere and clean up at the end this time as I was making few batches of icing :s felt so good when I cleaned up the kitchen, I even mopped the floor...
Making the 3-level cake was challenging, it is so heavy! I was lucky that I bought the turning platform when I was in London. When I iced the cake, I could turn around and made it even. It is indeed an important tool to invest if you want to ice a round cake nicely.
 For the decoration, I really sticked the pearls ONE BY ONE!! Actually at the beginning when I finished icing the cake, I thought it's good to leave it like that because the icing was nicely done :) but then I thought it would be nice to have some pearls on it to make it more elegant.
 So I started putting pearls... it took me hours to finish it. But when I took a photo, I found that these hours of work worths!

So... I just assembled what I had on hand, the effect looked good also. I was surprised hehe!
See... creativity haha!
Yay! I like it :)

PS I love the smell of the icing and the cake haha, I was tempted to eat it when I work on it :p

I know my cats were so tempted to eat it!
I try not to forget mentioning the square cake haha, it's pretty also :) I like putting the initial of their names "S" & "E" - it is not my design, I just used their design on the invitation card :)
My moment of victory - When the cakes brought out, people took photo of the couple with the cake (I know, they are the main focus point of the whole event), but also the cakes alone hoho, I was happy :)
The couple tasted it immediately, they told me it was tasty and beautiful :D Ahhh... I am relieved.
NOW, let me have some rest this week and relax :)
Tuesday, September 23, 2014
Raspberry shortcake
This week is a crazy week... because I'm making 2 wedding cakes for our beloved brother and sister at church, for more than 100 people. I feel a bit stressful but I know God is in control :)
I can't ignore our breakfast, I still need to do it hehe, so I made raspberry shortcake this time. This recipe is from Marta Stewart.
I made it several times before but I spread the jam on the shortcake, this time I bought some mascarpone cream so I want to use it to see how it tastes. I am happy that it tastes rich!


Ingredients (about 12-13):
3 cups flour
6tsp sugar
4 tbsp baking powder
1 tsp salt
170g butter at room temperature
1 tsp orange zest => strongly recommend to add it, the flavor tastes so good with orange zest!
1 cup heavy cream/whole milk - I used 30% cream
Decoration:
Whipping cream (at least 30% fat)
Raspberry/strawberry
Instructions:
1. Mix flour, sugar, baking powder, salt
Then add in butter & orange zest, mix well
2. Add in heavy cream & whole milk, mix well
3.(Optional) sprinkle sugar over the top
4. Line a baking sheet on a tray, use a spoon to scoop the dough and place on the tray
5. Bake at 205°c for 25 mins
5. For decoration, cut the shortcake into half.
Whip the cream until firm, put in the piping bag and squeeze it on the 2nd layer of the shortcake.
Put fruits on the cream and then cover with the top layer of the shortcake
Enjoy!
I can't ignore our breakfast, I still need to do it hehe, so I made raspberry shortcake this time. This recipe is from Marta Stewart.
I made it several times before but I spread the jam on the shortcake, this time I bought some mascarpone cream so I want to use it to see how it tastes. I am happy that it tastes rich!

This batch - I added cranberry in it, you can also add other dried fruits like raisins...
Ingredients (about 12-13):
3 cups flour
6tsp sugar
4 tbsp baking powder
1 tsp salt
170g butter at room temperature
1 tsp orange zest => strongly recommend to add it, the flavor tastes so good with orange zest!
1 cup heavy cream/whole milk - I used 30% cream
Decoration:
Whipping cream (at least 30% fat)
Raspberry/strawberry
Instructions:
1. Mix flour, sugar, baking powder, salt
Then add in butter & orange zest, mix well
2. Add in heavy cream & whole milk, mix well
3.(Optional) sprinkle sugar over the top
4. Line a baking sheet on a tray, use a spoon to scoop the dough and place on the tray
5. Bake at 205°c for 25 mins
5. For decoration, cut the shortcake into half.
Whip the cream until firm, put in the piping bag and squeeze it on the 2nd layer of the shortcake.
Put fruits on the cream and then cover with the top layer of the shortcake
Enjoy!
Saturday, September 20, 2014
Making salad builds up your creativity & brings some excitement to your taste buds
I like salad, it is fast, efficient & delicious :) It's healthy too!
When you prepare your salad, what do you think of? Salad, tomatoes, olive oil, vinegar... that's all? NO! There are so many ingredients you can add in according to the season.
It is indeed a test of creativity :)
About ingredients, I love adding fruits, cheese, nuts, seafood...
Sauce is important, which gives flavor to the salad, can lift up the taste :)
Basically I stick to olive oil & vinegar. But sometimes I add honey & lemon juice & lemon zest to bring out the refreshing taste!
 I added grapefruit and mozzarella :)

I hope you will now try to explore new ingredients, be brave and be creative!
Also please feel free to share your salad ingredients with me :)
Friday, September 19, 2014
Happy Friday

This is Hong Kong style bun :)

This French book for children to learn French, with cute pictures :) I do learn both English and French in this book haha! I want one for myself :)
Have a happy Friday & a nice weekend all of you!
Monday, September 15, 2014
Voyage in Budapest
Last week we went to Budapest to visit our friends living there, yes, they are Hungarian! (Let's do the Hungarian dance haha!)
It's the first time we go there so we were excited.
 They have the oldest metro in continental Europe, may be in the world also? The trains are short :) The door closes really fast and quite violent after the weird warning sound haha (My husband said he should have recorded the sound haha)
We saw old and new buildings mix together, river Danube, beautiful view along the river (the Parliament is really nice), different status of people from different countries, pubs inside an old compound (that's chic) with lots of art works....

This is street art I guess ;)

Outside a window of a shop, with a funny sign haha!
Things are so cheap there! We can have cheap meals :) What I appreciate also is that people can eat whenever they feel like, there is no fix breakfast time, lunch time & dinner time... For me it is convenient because I like tasting different food, so I needed not have regular meal!

 People really like eating or drinking in the street, it is one of the booth on the street, people just queue to buy the bread roll. You can have different tastes like sugar, cinnamon, walnuts..
Oh Ice-cream, mousse, cake, macaron... this is heaven... it is very rich and it can be almost a meal!


One of the nice Café, with nice decorations - old tiles, woods on the wall - very artistic :)
Tea is very popular in the Eastern Europe, especially fruit tea. I like rapsberry tea!

They have coffee called "melange" - coffee with honey at the bottom! I like it :)
I almost forgot their famous activity - Turkish bath! We tried all the pools with different temperature haha! It was a good experience. :) That reminds me a lot when I was in Finland, we had hot dry naked sauna haha!
Sorry no photo :(
I just love this city...
Now I have to get back to work :(
Subscribe to:
Posts (Atom)