Japanese cheese cake is soft and fluffy, it's like a cloud :) The flavor is not very strong, but just right. Oh, it's heaven!!
I saw a friend made one, it looks very successful like the ones in Japan. She shared her recipe with me, so I want to share with you all :)
Ingredients
250g cream cheese at room temperature
20g sugar
4 egg yolk
120ml cream (at least 30% fat)
40ml vegetable oil
30g flour
20g corn starch
4 egg white
40g sugar
few drops of lemon juice (optional)
Instructions
1. Place a baking sheet at the bottom of a 6" cake mould, grease the side
If the mould is amovible, wrap the bottom with aluminium foil to prevent cake mixture leak out or water enters the mould
Place a large mould that you can fill hot water before baking
2. In a mixing bowl, beat cream cheese and sugar
Add in egg yolk, beat until blend well
3. Add in cream little by little at beginning, until you see the mixture blends well, then add in more each time - ensure cream cheese mixture has no lumps
Add in oil, mix well
4. Sieve flour & corn starch, then add in little by little, mix well
Preheat the oven to 170°c
5. In another mixing bowl, whisk egg white with lemon juice until the whisking marks stay
Add in sugar in 2-3 times, until egg white becomes firm
Note: do not whisk until the egg white has firm peak, or it will be hard to blend egg white evenly into egg mixture later
6. Fold in egg white in 3 times into the egg mixture, with light and quick motion
7. Boil water
Pour the cake mixture to the mould, tape the mould several times to remove excess big air bubbles
When water is boiled, pour it into the large mould, fill until 1/2 height of the cake mould
8. Bake the cake for 45mins
If the cake surface becomes golden before time is up, cover aluminium foil on the top
Note: I cover mine at last 20mins
9. After 45mins, turn off the oven, open the oven door a bit and use a wooden spoon to prevent the door closes, leave the cake cools down 8-10mins - prevent cake from being collapsed/ shrinking because of the cold air
Note: do not leave it longer than 10 mins, or the humidity in the oven creates wrinkle marks
10. Take the cake out of the oven, tape the working surface several times gently to remove the heat
Leave the cake cool down completely in the mould, then store in the fridge for 3 hours
After 3 hours, take the cake out and remove the mould
Enjoy!
As recently I made some kimchi, I wonder what dishes I can make. Then I found this Japanese hot pot in Korean style, so I want to give it a try :)
The result is so good, Korean fermented chili paste is the key of this recipe. It makes the whole dish to become sweet and spicy.
I wish I could add kimchi in this hotpot but my husband couldn't stand such spicy taste :( I have to eat kimchi apart as side dish, but it's ok!
Warning: if you can't eat too spicy, omit kimchi, I know it is called kimchi hot pot but I don't want you to choke by the spice!! Korean fermented chili paste can be spicy enough :)
Ingredients
Dashi Stock:
450ml or 2 cups water
2 dried baby sardines
2g dried kombu seaweed, shredded
Hot pot:
1 onion, sliced
2 packages Udon noodles
100g Kimchi
40g green onion, sliced
40g Shimeji mushrooms
1 clove garlic, crushed
7g fresh ginger, shredded
3 tbsp sake
1 1/2 tbsp Korean fermented chili paste - Gochujang
1 tbsp miso
150g silken tofu
2 pieces cod fish
80g spring onion or scallions
sesame oil
Instructions
1. In a mixing bowl, place water, soak sardines & kombu for 30 mins
2. After 30mins, in a cooking pot, place onion, then udon noodles on the top
add in Kimchi, green onion, mushrooms, garlic & ginger
Pour dashi stock with sardines & kombu, you can remove them by the end if you like
Add sake
Turn on the heat to high, bring it to boil
3. When it boils, reduce the heat to medium
In a small bowl, place gochujang & miso, add in 1-2 tbsp boiling soup, mix well
Pour the mixture back to the boiling soup
4. Add in tofu, let it simmer for 3mins
Add in cod fish and spring onion/scallions
Drizzle sesame oil on the top
Serve hot!
Enjoy!
I made some kimchi recently, looking at my Korean cook book to discover what dish I can make.
This recipe is easy, so I tried it.
Please note that I didn't add pork in it since I am no longer fan of pork.
Warning: it is extremely spicy so if you can't eat too spicy, don't add too much kimchi... or it will burn your throat!
Ingredients
300g kimchi
200g tofu
1/2 stalk green onion
150g pork shoulder
1 tsp vegetable oil
Seasoning for pork:
1/2 tsp minced garlic
1/2 tsp fish sauce
1/2 tsp red chili powder
1 tsp ginger juice
pepper
Instructions
1. Cut pork into small bite-size pieces and marinate with the seasonings for 15mins
2. Cut kimchi into 3-4 cm long pieces
Slice tofu into flat rectangles 1/2" thick
Slice green onion diagonally
3. In a pot, heat up oil over medium heat. When oil is hot, add in pork and stir fry it, until pork color starts changing
Add in kimchi & stir fry it with pork for about 3 mins, until the pork just cooked
4. Pour water just cover kimchi & pork and let it boil
When it boils, turn the heat down to low, let it simmer for 20 mins
5. Add tofu & green onion & boil for another 5 mins
Serve hot with rice!
Enjoy!
When I found this recipe, I'm so happy :) I am not fan of roasted pork belly, but my husband is! I can imagine he would be more than satisfied when he can eat it here, especially it is home made :)
Ingredients
1 Pork belly with skin*
Water
Fresh ginger, peel off skin and use a knife press it gently
Scallion
1 tbsp fine salt
1 tbsp rice wine
Marinate pork:
1 tbsp fine salt
1 tbsp rice wine
Cooking coarse salt
*the skin lays flat instead of one side higher & another side lower
Instructions
1. Prepare the pork belly the night before
Boil water in a cooking pot, place ginger, scallion, salt & wine
When water boils, place pork belly, reduce heat to medium, let it cook for 30 mins
This step is to remove bad smell of pork belly, also to remove blood in the meat
2. Discard water, run cold water on pork to let it cool down a bit
Use kitchen paper to absorb excessive water, as dry as possible
Place pork in a mixing bowl, add in seasonings, use hand to rub the seasonings over the pork evenly
Wrap the mixing bowl with plastic wrap, place it in the fridge to marinate the pork overnight
3. The day you cook, take the pork out from the fridge
Use kitchen paper to absorb excessive water, as dry as possible (with the skin facing upward)
Preheat the oven to 150°c
4. Place an aluminium foil on the tray, then place another foil to wrap the pork - only meat part, to keep meat juice when bake, also not to burn the meat
Place coarse salt on the skin
Bake for 1 hour
5. After 1 hour, take the pork out from the oven, raise the temperature of the oven to 200°c
Remove all coarse salt from the skin, then open the foil
When oven is ready, place it back to oven at the upper rack, and bake for 20 mins
You can see the skin appears bubbles and it becomes dry and golden color
6. After 20 mins, take it out and leave it cool down for 10 mins
7. Slice the pork on a chopping board
Serve immediately with a bowl of rice!
Enjoy!
This is a wonderful recipe for a bunch of people! I really love the caramel of this recipe! :)
Ingredients
Brownie:
150g dark chocolate
200g butter
1 1/2 cup brown sugar
3/4 cup flour
2 tbsp cocoa (I used 100%)
3 eggs
Caramel:
1 1/2 cup sugar
1/2 cup water
3/4 cup 30% fat cream
90g butter
Sea salt for sprinkle on caramel
Instructions
1. Prepare brownie:
Preheat oven to 160°c
In a small pan over low heat, place chocolate and butter, stir regularly until melted and smooth
Set aside
2. In a large mixing bowl, place sugar, flour, cocoa, mix well
Add in eggs, mix well
Add in chocolate mixture, mix until blended
3. On a 20cm X 30cm pan, line a baking sheet
Pour the mixture onto the pan, spread evenly with the help of a spetula
Bake for 35 mins or until cooked: you can insert a toothpick, if comes out clean = ready
4. Let the brownie cool down, put in the fridge to let cool completely
5. Prepare caramel:
In a small pot over medium heat, place cream and butter until butter is melted
Remove from heat and set aside
6. In a small saucepan over high heat, place sugar and water, stir to combine
Bring to boil and cook, DO NOT stir
Once the syrup starts caramelising, you can stir it briefly, then let the temperature rises, until temperature reaches 175°c and the color becomes dark golden (when you see the color changes = reaches 160°c, so start observing)
If the edge appears sugar crystals, use a wet pastry brush gently wipe them off - this can stop caramel from crystallising
7. Turn off the heat and remove from heat immediately, be careful when handle it!
Slowly pour HOT caramel into the cream mixture, at the same time stir the cream mixture continuously, DO NOT scrape the edges
Note: if crystals form, don't panic, you can still pour into the cream mixture, keep stirring can dissolve the crystal gradually in step 8. You can use spetula to gently press the crystals towards the edges, that helps too!
8. Put back to cook over low heat, stir for 7-10 mins or until caramel is thickened a bit
Let it cool down a bit, stir regularly when cooling to prevent the surface dries out
9. Pour caramel onto brownie, let the caramel cool down
Put brownie to the fridge to cool down and let the caramel fix for 4-5 hours or until firm, or even overnight
10. When serving, cut the brownie into squares and sprinkle with sea salt
Enjoy!
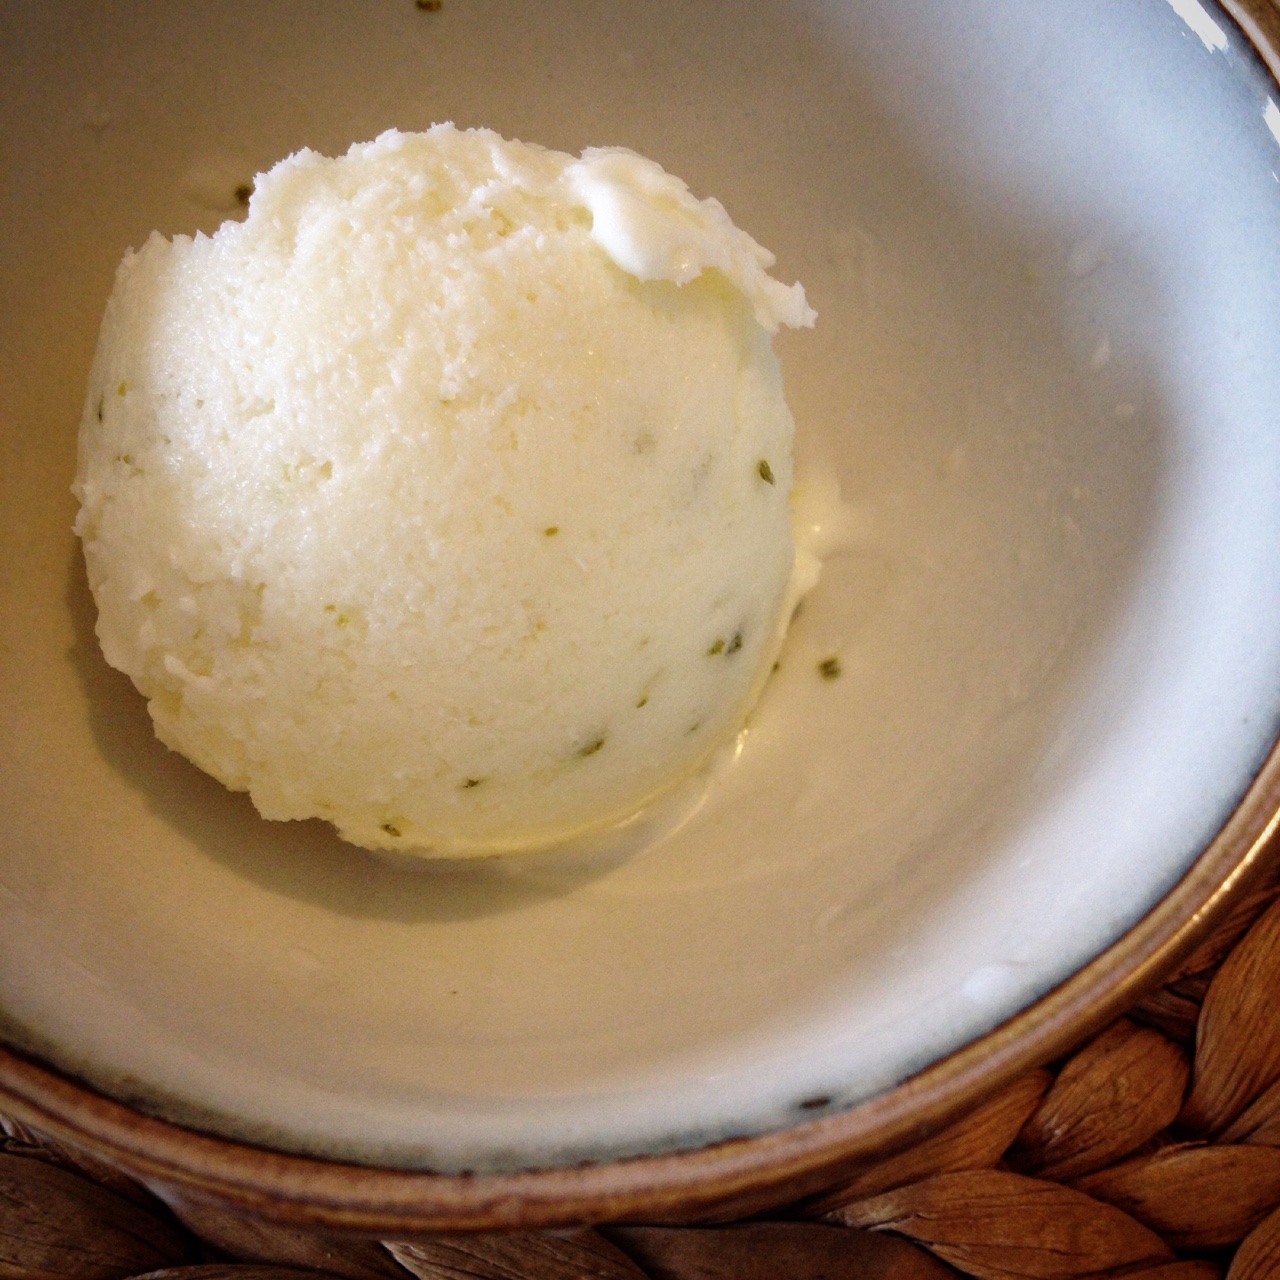
This was a recipe for a frozen tart, but I use it as ice-cream :) The lime taste is wonderful, very refreshing. It is a perfect match with coconut cream, cream cheese & yogurt :)
Ingredients
240g cream cheese, at room temperature
1 cup sugar
1 cup coconut cream
1/4 cup lime zest
1/2 cup fresh lime juice
240g greek yogurt
Instructions
1. In a mixing bowl, beat cream cheese and sugar until blend well
2. Add in coconut cream, lime zest and lime juice and mix well
3. Add in greek yogurt, mix well
4.
With Ice-cream machine:
Pour the mixture into ice-cream machine and follow the machine instructions
Without Ice-cream machine:
- Pour the mixture into a shallow mould or container, put in the freezer & let it chill for 1 hour
- After 1 hour, take it out, use a spetula to mix the mixture, put back to freezer & chill for 1 hour
- After 1 hour, take it out, mix with spetula
- Repeat that for 3-4 times, until the mixture become solid but not hard
* If you wait until next day to serve, take it out 30mins before serving
Enjoy!
It is getting colder and colder, something hot will be nice :) I saw people start posting hotpot photos on Facebook, that makes me want to have one too! This recipe is not hotpot but simmer dish, which I like too.
Ingredients
260g Grilled firm tofu
100g Onion
80g Shimeji Mushrooms
2 stalks Shungiku leaves (tongho)*
5g Ginger root
150g Thin beef slice
Broth:
150ml Dashi stock
2 tbsp Sake
1 tbsp Mirin
1 tbsp cane sugar
1 1/2 tbsp Soy sauce
*substitute: bok choy, scallions or napa cabbage
Instructions
If you want tofu absorbs more broth flavor, you can -
Freeze tofu a night before or at least 4 hours ahead. Defrost it several hours before use
When it is defrosted, squeeze out the water from the tofu by using a cutting board & gently pressing your hand on it
1. Slice tofu into 1/2" wide pieces
Slice onion into 6 portions, separate slices
Remove mushrooms root and separate them
Cut Shungiku leaves or other vegetables into small portions
Shred ginger lengthwise
2. In a deep pan, combine all ingredients of broth
Place tofu into the pan, turn the heat to medium heat
When the broth starts boiling, flip tofu regularly, add in onion, let it simmer for 2-3mins
3. Add in mushroom, let it simmer for 2-3 mins
Add in beef slice and ginger root
4. When beef turns color to brown, add in Shungiku leaves
When the leaves become soft, turn off the heat
5. In a serving plate, arrange the ingredients
Pour the broth by a ladle onto the ingredients
Serve hot with rice :)
Enjoy!
I bought a pasta machine few years ago, but I do not use it often :( I do not make pasta as often as rice or noodles. It is because I thought pasta dish always matches with tomato sauce or white sauce or simply olive oil, it makes me feel bored... Another thing is that I didn't spend time to discover different sauces for pasta...
However, when I saw this recipe, the sauce attracted my attention :) I have a chance to use my pasta machine!
Ingredients
1/4 cup white wine
1/4 cup white wine vinegar
1/3 cup chopped shallot
140g unsalted butter
14 medium sizes shrimp (shells removed)
3 tbsp chopped chives
1/3 cup chopped fresh parsley
1 1/2 tsp grated lemon zest
3 tbsp lemon juice
1/2 tsp salt
250g tagliatelle
3 tbsp pasta cooking water
Salt & pepper
Instructions
1. In a sauce pan at medium heat, boil wine, vinegar and shallot until liquid reduced to about 1 tbsp
Add 1/3 butter and whisk constantly
Add remaining butter, whisk constantly, let it completely melted
2. Reduce heat to low, add in shrimp to cook, flip to another side so that both sides cook well
In another pot, boil water to cook pasta
3. When the shrimp changes its color, add in chives, parsley, lemon zest, lemon juice and salt
4. When water boils, add in salt and then pasta, let it cook until al dente
Reserve 3 tbsp pasta cooking water and discard the rest
5. In a serving plate/ shallow bowl, place pasta, then shrimp sauce and pasta cooking water
Season with salt & pepper
Enjoy!
Beans... was not my favorite food, I don't like it so much when I was young. The taste was not good, it is always sold frozen with carrots and other vegetables... my mother liked cooking it with pasta and serve in soup.
Now I like it more, as I can cook in the way I like. I found this recipe is delicious especially serving with pasta, serving like salad. Or you can serve as first course :)
Ingredients
6 cups water
1 tbsp salt
600g frozen butter beans
3 tbsp butter
Juices of 2 limes
1 cup fresh mint leaves, chopped
salt & ground black pepper
1 tsp grated lime zest
Instructions
1.In a saucepan, boil water & salt over high heat
Add beans & cook until tender, about 10-12 mins or until you can poke the beans by a fork
Drain water and try to remove water as much as possible
2. In a serving bowl, put butter and place beans on the top, mix well until butter melted
Add lime juice & mix well
Add in mint, salt & pepper
Sprinkle lime zest on the top
Enjoy!
I know it is getting chill now, but cucumbers are on sale... also I saw a recipe with a special salad sauce in a cooking magazine. The way of presenting this cucumber is nice :D
Ingredients
1/2 red onion
1/8 cup rice vinegar
1 tbsp whole grain Dijon mustard
1 tbsp honey
sea salt
ground pepper
1 cucumber
Optional: 1 tbsp chopped dill
Instructions
1. Thinly slice red onion, separate the layers, set aside
2. In a small pot with lid, place vinegar, mustard, honey, salt & pepper
Cover the lid & shake to mix well
Add in onion & let pickle for 30mins
3. Slice the cucumber in lengthwise with vegetable peeler, be careful!
Place them in a bowl, drain excess water
Right before serving, add in onion salad dressing
Enjoy!